Productionizing
Moving To Production
When you’re ready to move to production, there are a few things to keep in mind and best practices to follow to get the most out of Overwatch
Cluster Logging
Simplify and Unify your cluster logging directories
- Many users forget to enable cluster logging and without it Overwatch cannot provide usage telemetry by notebook, job, user so it’s critical that all clusters have clusters logs enabled
- If users are allowed to create clusters/jobs without any governance, log files will be produced and stored all over the place. These will be very challenging to clean up and can eat up a significant amount of storage over time.
- Utilize cluster policies to ensure the logging location is always set and done so consistently
- Set up a lifecycle policy (i.e. TTL) on your cluster logging directory in your cloud storage so the logs don’t pile up indefinitely. Suggested time to live time is 30 days.
Backups
(This will be Deprecated from version 7.2.1.Please refer to the Snapshot section for the new way to do backups)
Perform Bronze Backups
I know we don’t hear a lot about backups in big data world but often times the cluster logs and / or
the audit logs are transient (especially Azure deployments as Event Hub only maintains 7 days). This means that if
something happened to the bronze data your Overwatch history could be lost forever. To guard against this it’s
strongly recommended that you periodically backup the Bronze data. As of 0.6.1.1 this has been made very easy through
the snapshot helper function.
Now just schedule a notebook like this to run once a week and you’ll always have at 1 week of backups
import com.databricks.labs.overwatch.pipeline.Bronze
import com.databricks.labs.overwatch.utils.Helpers
val workspace = Helpers.getWorkspaceByDatabase("overwatch_etl") // can be used after pipeline is running successfully

// alternative method for getting a workspace is
// import com.databricks.labs.overwatch.pipeline.Initializer
// val workspace = Initializer("""<compact config string>""")

// simple method
Bronze(workspace).snapshot("/path/to/my/backups/sourceFolder", true)

// alternative method with more customized configs
Bronze(workspace).snapshot(
  targetPrefix = "/path/to/my/backups/sourceFolder",
  overwrite = true,
  excludes = Array("audit_log_raw_events", "clusters_snapshot_bronze") // not recommended but here for example purposes
)
Snapshot Process
Snapshoting in Big Data World is very rare but often times the cluster logs and / or the audit logs are transient (especially Azure deployments as Event Hub only maintains 7 days). This means that if something happened to the bronze data your Overwatch history could be lost forever. To guard against this you now have the option to periodically snapshot the Overwatch data, as of version 0.7.2.1
Currently, There are two types of Snapshot process available in Overwatch: Full or Incremental:
Full Snapshot
This is normal Snapshot process where we take the backup of ETL Database in Batch method. Here we can do Deep Cloning of existing ETL database tables to target Snapshot RootPath.
Incremental Snapshot
Through Incremental_Snap we take the snapshot of the ETL tables incrementally i.e. through streaming operation.
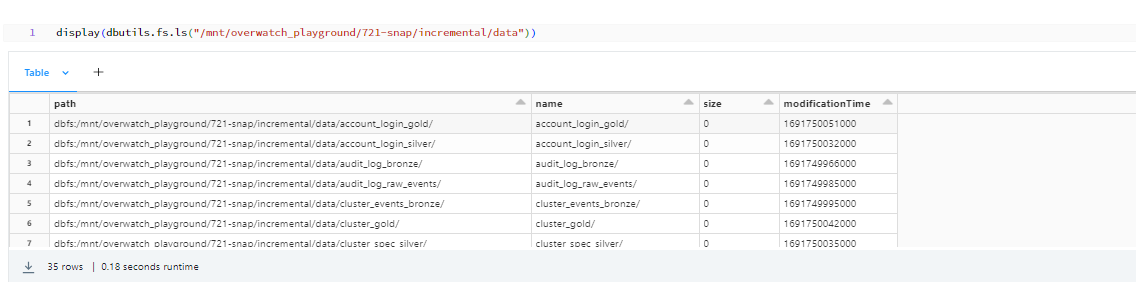
This process will require us to maintain a checkpoint directory. Below is the screenshot of the snap location after snapshot process is done

- “snapshotRootPath/data” - Contains the Snapshot Data of Source Database Tables.
- “snapshotRootPath/clone_report” - Contains the data containing run metrics.
- “snapshotRootPath/checkpoint” - Checkpoint Location for Streaming Operation.
How to run the Snapshot Process
You can run the Snapshot process via a scheduled job, or a notebook.
Snapshot through Databricks Notebook
The code snippet to run the Snapshot process is as below:
import com.databricks.labs.overwatch.pipeline.Snapshot
val sourceETLDB = "ow_bronze_snapshot_etl"
val targetPrefix = "/mnt/overwatch_playground/721-snap/incremental"
val pipeline = "Bronze,Silver,Gold"
val snapshotType = "Incremental"
val tablesToExclude = "notebook_silver,notebook_gold"
Snapshot.process(sourceETLDB,targetPrefix,snapshotType,pipeline,tablesToExclude)
We need below parameters to run the snapshot process through Databricks Notebook:
| Param | Type | Optional | Default Value | Description |
|---|---|---|---|---|
| sourceETLDB | String | No | NA | Source Database Name for which Snapshot need to be done(note you should only snapshot your Overwatch etl database). |
| targetPrefix | String | No | NA | Target path where Snapshot data will be saved to. |
| snapshotType | String | No | NA | Type of Snapshot to be performed. “Full” for Full Snapshot, “Incremental” for Incremental Snapshot |
| pipeline | String | Yes | “Bronze,Silver,Gold” | Define the Medallion Layers. Argument should be in form of “Bronze, Silver, Gold”(All 3 or any combination of them) |
| cloneLevel | String | Yes | “DEEP” | Clone Level for Snapshot. By Default it is “DEEP”. You can also specify “SHALLOW” Clone. You can get more details on cloning here |
| tablesToExclude | String | Yes | "" | Array of table names to exclude from the snapshot. Tables should be separated with “,”. This is the table name only - without the database prefix. |
The snapshot data will be in the “targetPrefix/data” path as shown below:
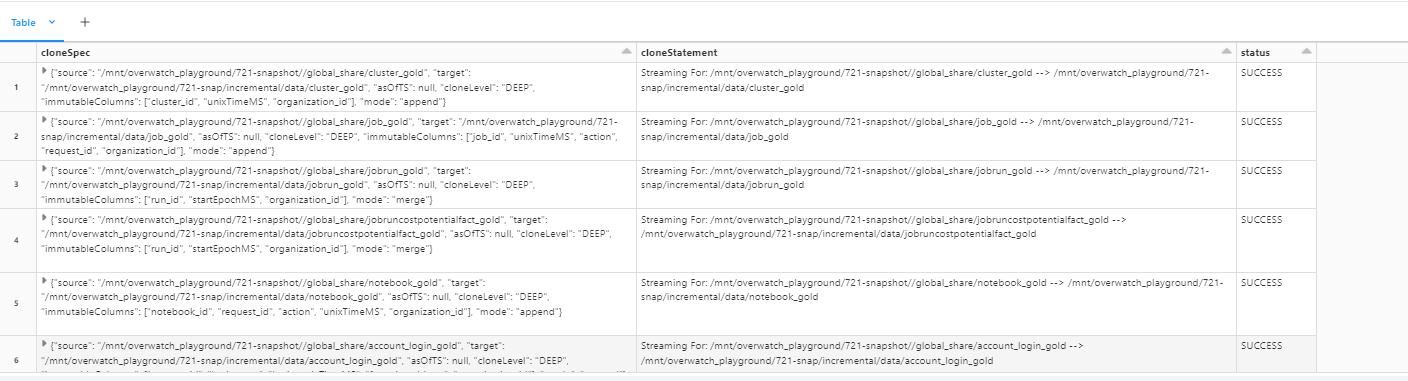
If you look into the targetPrefix folder you will find another subdirectory called “clone_report”. This folder contains the data regarding the status of your snapshot process for each table:
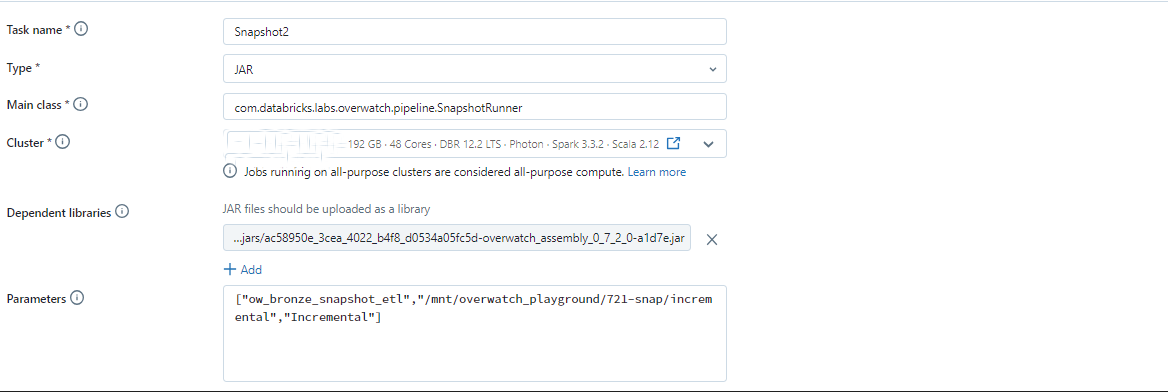
Snapshot through Databricks Job
You can also schedule a job to either run the notebook above, or use the SnapshotRunner class. For example:
- Type - Jar
- Main class - com.databricks.labs.overwatch.pipeline.SnapshotRunner
- Parameters for the Job - Same as mentioned above for snapshot-through-databricks-notebook
Validation Functionality
This is a special module in Snapshot Process. Before running your Snapshot, you can validate that your configuration is correct by calling the Snapshot.isValid function. This function is also used internally when the Snapshot is kicked off.
Below is the code snippet for the validation function
import com.databricks.labs.overwatch.pipeline.Snapshot
val sourceETLDB = "ow_bronze_snapshot_etl"
val pipeline = "Bronze,Silver,Gold"
val snapshotType = "Incremental"
Snapshot.isValid(sourceETLDB,snapshotType,pipeline)
This function will return true if the configuration is valid, and will also output relevant info for the fields checked. For example:
ow_bronze_snapshot_etl is Overwatch Database and suitable for Snapshot.
Snapshot Type is Suitable for Snapshot Process. Provided SnapshotType value is Incremental.
cloneLevel Type is Suitable for Snapshot Process. Provided cloneLevel value is DEEP.
Validation successful.You Can proceed with Snapshot process
import com.databricks.labs.overwatch.pipeline.Snapshot
res14: Boolean = true
Restore Process
You can use the Restore process to bring back snapshot data Similar to Snapshot, Restore can be run by both Databricks Job and Databricks Notebook.
Restore through Databricks Notebook
The code snippet to run the Restore process is as below:
import com.databricks.labs.overwatch.pipeline.Restore
val sourcePrefix = "/mnt/overwatch_playground/721-snap/full"
val targetPrefix = "/mnt/overwatch_playground/721-snap/restore"
Restore.process(sourcePrefix,targetPrefix)
We need below parameters to run the Restore process through Databricks Notebook:
| Param | Type | Optional | Description |
|---|---|---|---|
| sourcePrefix | String | No | Source ETL Path Prefix from where restore need to be performed. |
| targetPrefix | String | No | Target ETL Path Prefix where restore data will be loaded to. |
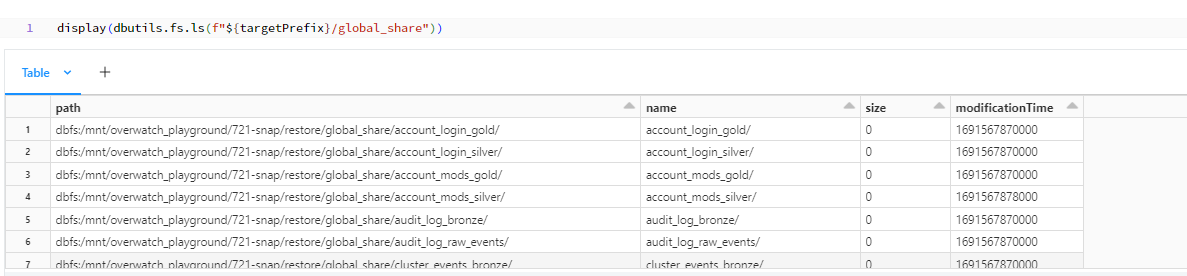
After Restore process is done the tables from sourcePrefix will be restored in the targetPrefix/globalshare location
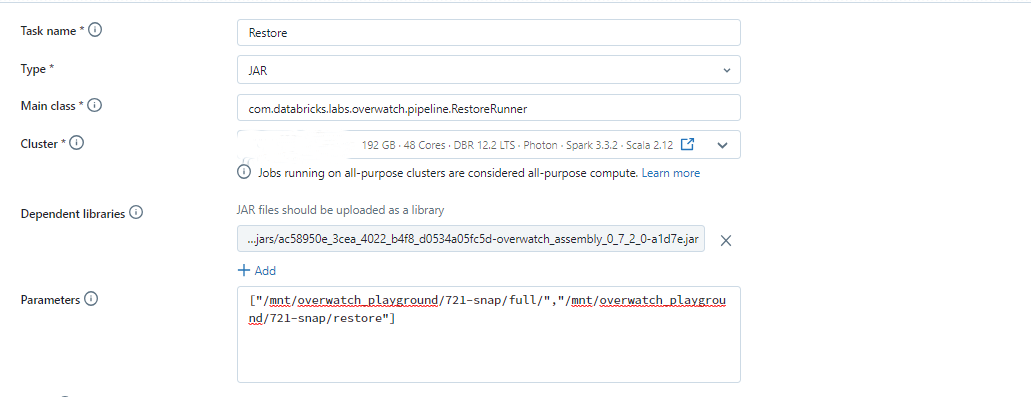
Restore through Databricks Job
In cases where you need to periodically run the Restore process, you can configure a job using the RestoreRunner class.
- Type - Jar
- Main class - com.databricks.labs.overwatch.pipeline.RestoreRunner
- Parameters for the Job - Same as mentioned above for Restore through Databricks Notebook
Validation Functionality
Before running Restore, we recommend that you validate that your configuration is correct by calling the Restore.isValid function. This function is also used internally when the Restore process is kicked off
Below is the code snippet for the validation function
import com.databricks.labs.overwatch.pipeline.Restore
val sourcePrefix = "/mnt/overwatch_playground/721-snap/full"
val targetPrefix = "/mnt/overwatch_playground/721-snap/restore"
Restore.isValid(sourcePrefix,targetPrefix)
This function will return true if the configuration is valid, and will also output relevant info for the fields checked. For example:
SourcePrefix Path Exists.
Target Path /mnt/overwatch_playground/721-snap/restore is Empty and is Suitable for Restore Process
Validation successful.You Can proceed with Restoration process
import com.databricks.labs.overwatch.pipeline.Restore
res43: Boolean = true
Migration Process
There are cases when you need to move your data altogether. During the Migration process, we will move your data to the new location, update the configuration to point to this new location, as well as delete the old database if everything looks good. These the steps required to Migrate your Overwatch data:
- Stop Overwatch jobs (Need to be done by User)
- Run the Migration process (Use Migrate.process)
- Resume Overwatch jobs (Need to be done by User)
Migration through Databricks Notebook
The code snippet to run the Migration process is as below:
import com.databricks.labs.overwatch.pipeline.Migration
val sourceETLDB = "ow_bronze_migration_etl"
val migrateRootPath = "/mnt/overwatch_playground/721-snap/migration"
val configPath = "abfss://overwatch-field-playground@overwatchglobalinternal.dfs.core.windows.net/sourav/configs/721-migration"
val tablesToExclude = "notebook_silver:notebook_gold"
Migration.process(sourceETLDB,migrateRootPath,configPath,tablesToExclude)
We need below parameters to run the Migration process through Databricks Notebook:
| Param | Type | Optional | Description |
|---|---|---|---|
| sourceETLDB | String | No | Source Database Name to migrate. Note that you can only use the Overwatch ETL database. |
| migrateRootPath | String | No | Target path to where migration need to be performed. |
| configPath | String | No | Configuration Path where the config file for the source is present. Path can be to a CSV file or path to a delta table, or simple a delta table name that contains your configuration. |
| tablesToExclude | String | Yes | Array of table names to exclude from the migration. This is the table name only - without the database prefix. By Default it is empty. |
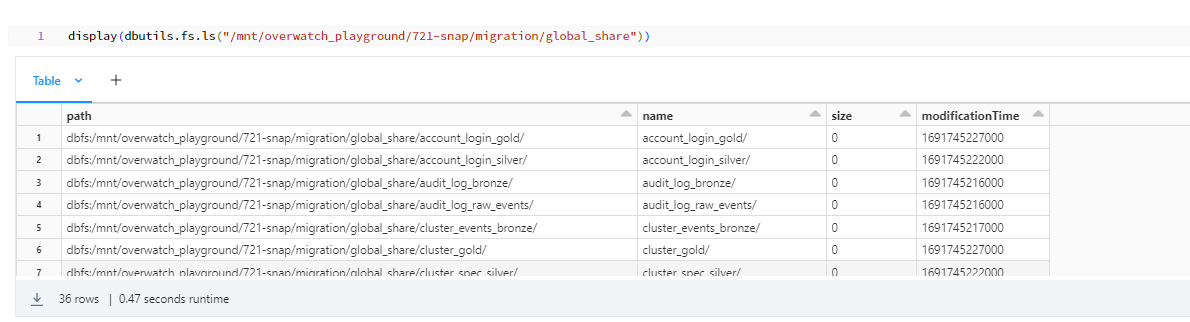
After Migration process is done the tables from sourcePrefix will be restored in the migrateRootPath/globalshare location
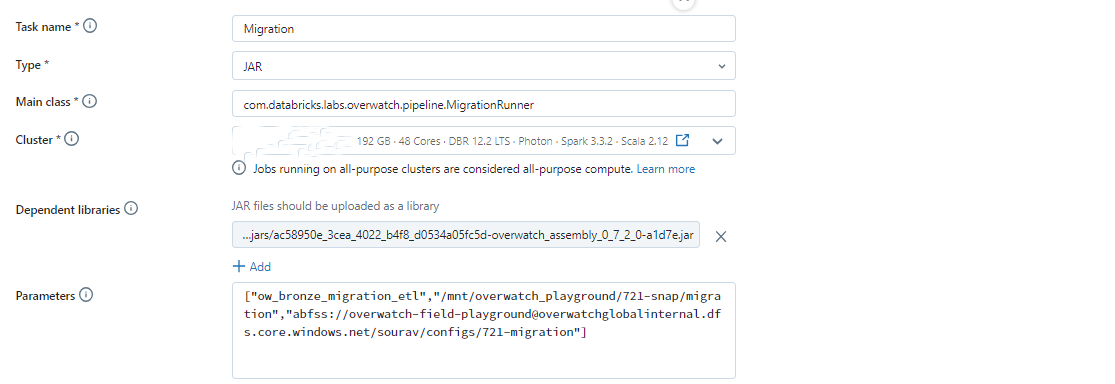
Migration through Databricks Job
Below is the Configuration for the Databricks Job
- Type - Jar
- Main class - com.databricks.labs.overwatch.pipeline.MigrationRunner
- Parameters for the Job Same as mentioned above for Migration through Databricks Notebook
Validation Functionality
Before running the Migration, we recommend that you validate that your configuration is correct by calling the Migration.isValid function. This function is also used internally when the Migration process is kicked off.
Below is the code snippet for the validation function
import com.databricks.labs.overwatch.pipeline.Migration
val sourceETLDB = "ow_bronze_migration_etl"
val configPath = "abfss://overwatch-field-playground@overwatchglobalinternal.dfs.core.windows.net/sourav/configs/721-migration"
Migration.isValid(sourceETLDB,configPath)
This function will return true if the configuration is valid, and will also output relevant info for the fields checked. For example
ow_bronze_migration_etl is Overwatch Database and suitable for Migration
Config file is properly configured and suitable for Migration
Config source: delta path abfss://overwatch-field-playground@overwatchglobalinternal.dfs.core.windows.net/sourav/configs/721-migration
Validation successful.You Can proceed with Migration process
import com.databricks.labs.overwatch.pipeline.Migration
res13: Boolean = true
Alerting On Failures
Overwatch modules are designed to fail softly. This means that if your silver jobs module fails the job will still succeed but the silver jobs module will not progress and neither will any downstream modules that depend on it. To be alerted when a specific module fails you need to configure a DBSQL alert to monitor the pipReport output and fire an alert when conditions are met.
How To Set Up Module Level Alerting
Documentation in progress – publishing soon
Ensure Externalize Optimize is Enabled
To ensure Overwatch is efficient it’s important to remove the optimize and z-order steps from the integrated pipeline. To do this, follow the instructions for Externalizing Optimize & Z-Order