Azure
- Configuring Overwatch on Azure Databricks
- Reference Architecture
- Configuring Audit Log Delivery Through Event Hub
- Setting up Storage Accounts
- Mount Storage Accounts
Configuring Overwatch on Azure Databricks
Reach out to your Customer Success Engineer (CSE) to help you with these tasks as needed. To get started, the Basic Deployment configuration. As more modules are enabled, additional environment configuration may be required in addition to the Basic Deployment.
There are two primary sources of data that need to be configured:
- Audit Logs
- These will be delivered through Event Hubs. The audit logs contain data for every interaction within the environment and are used to track the state of various objects through time along with which accounts interacted with them. This data is relatively small and it certainly doesn’t contain any large data sets like cluster/spark logs.
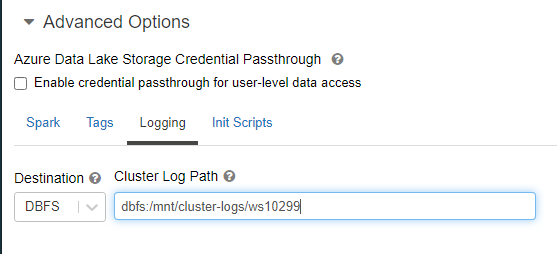
- Cluster Logs - Crucial to get the most out of Overwatch
- These logs can get quite large and they are stored in a very inefficient format for query and long-term storage. This is why it’s crucial to create a dedicated storage account for these and ensure TTL (time-to-live) is enabled to minimize long-term, unnecessary costs. It’s not recommended to store these on DBFS directly (dbfs mount points are ok).
- Best Practice - Multi-Workspace – When multiple workspaces are using Overwatch within a single region it’s best to ensure that each are going to their own prefix, even if sharing a storage account. This greatly reduces Overwatch scan times as the log files build up. If scan times get too long, the TTL can be reduced or additional storage accounts can be created to increase read IOPS throughput (rarely necessary) intra-region.
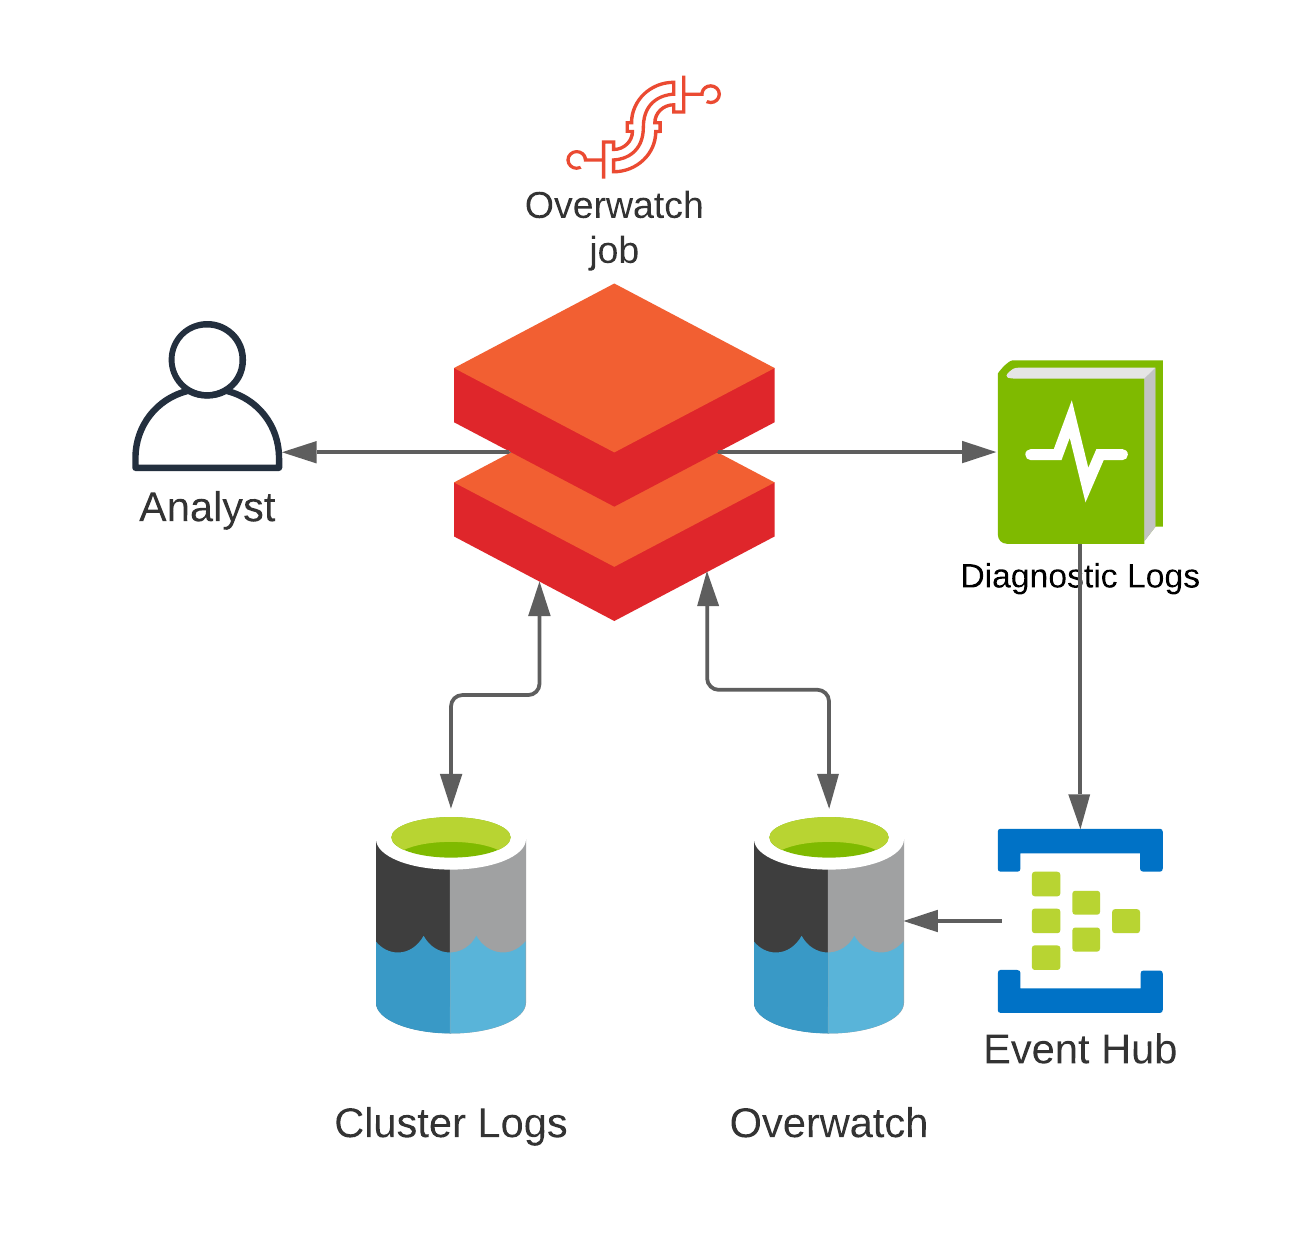
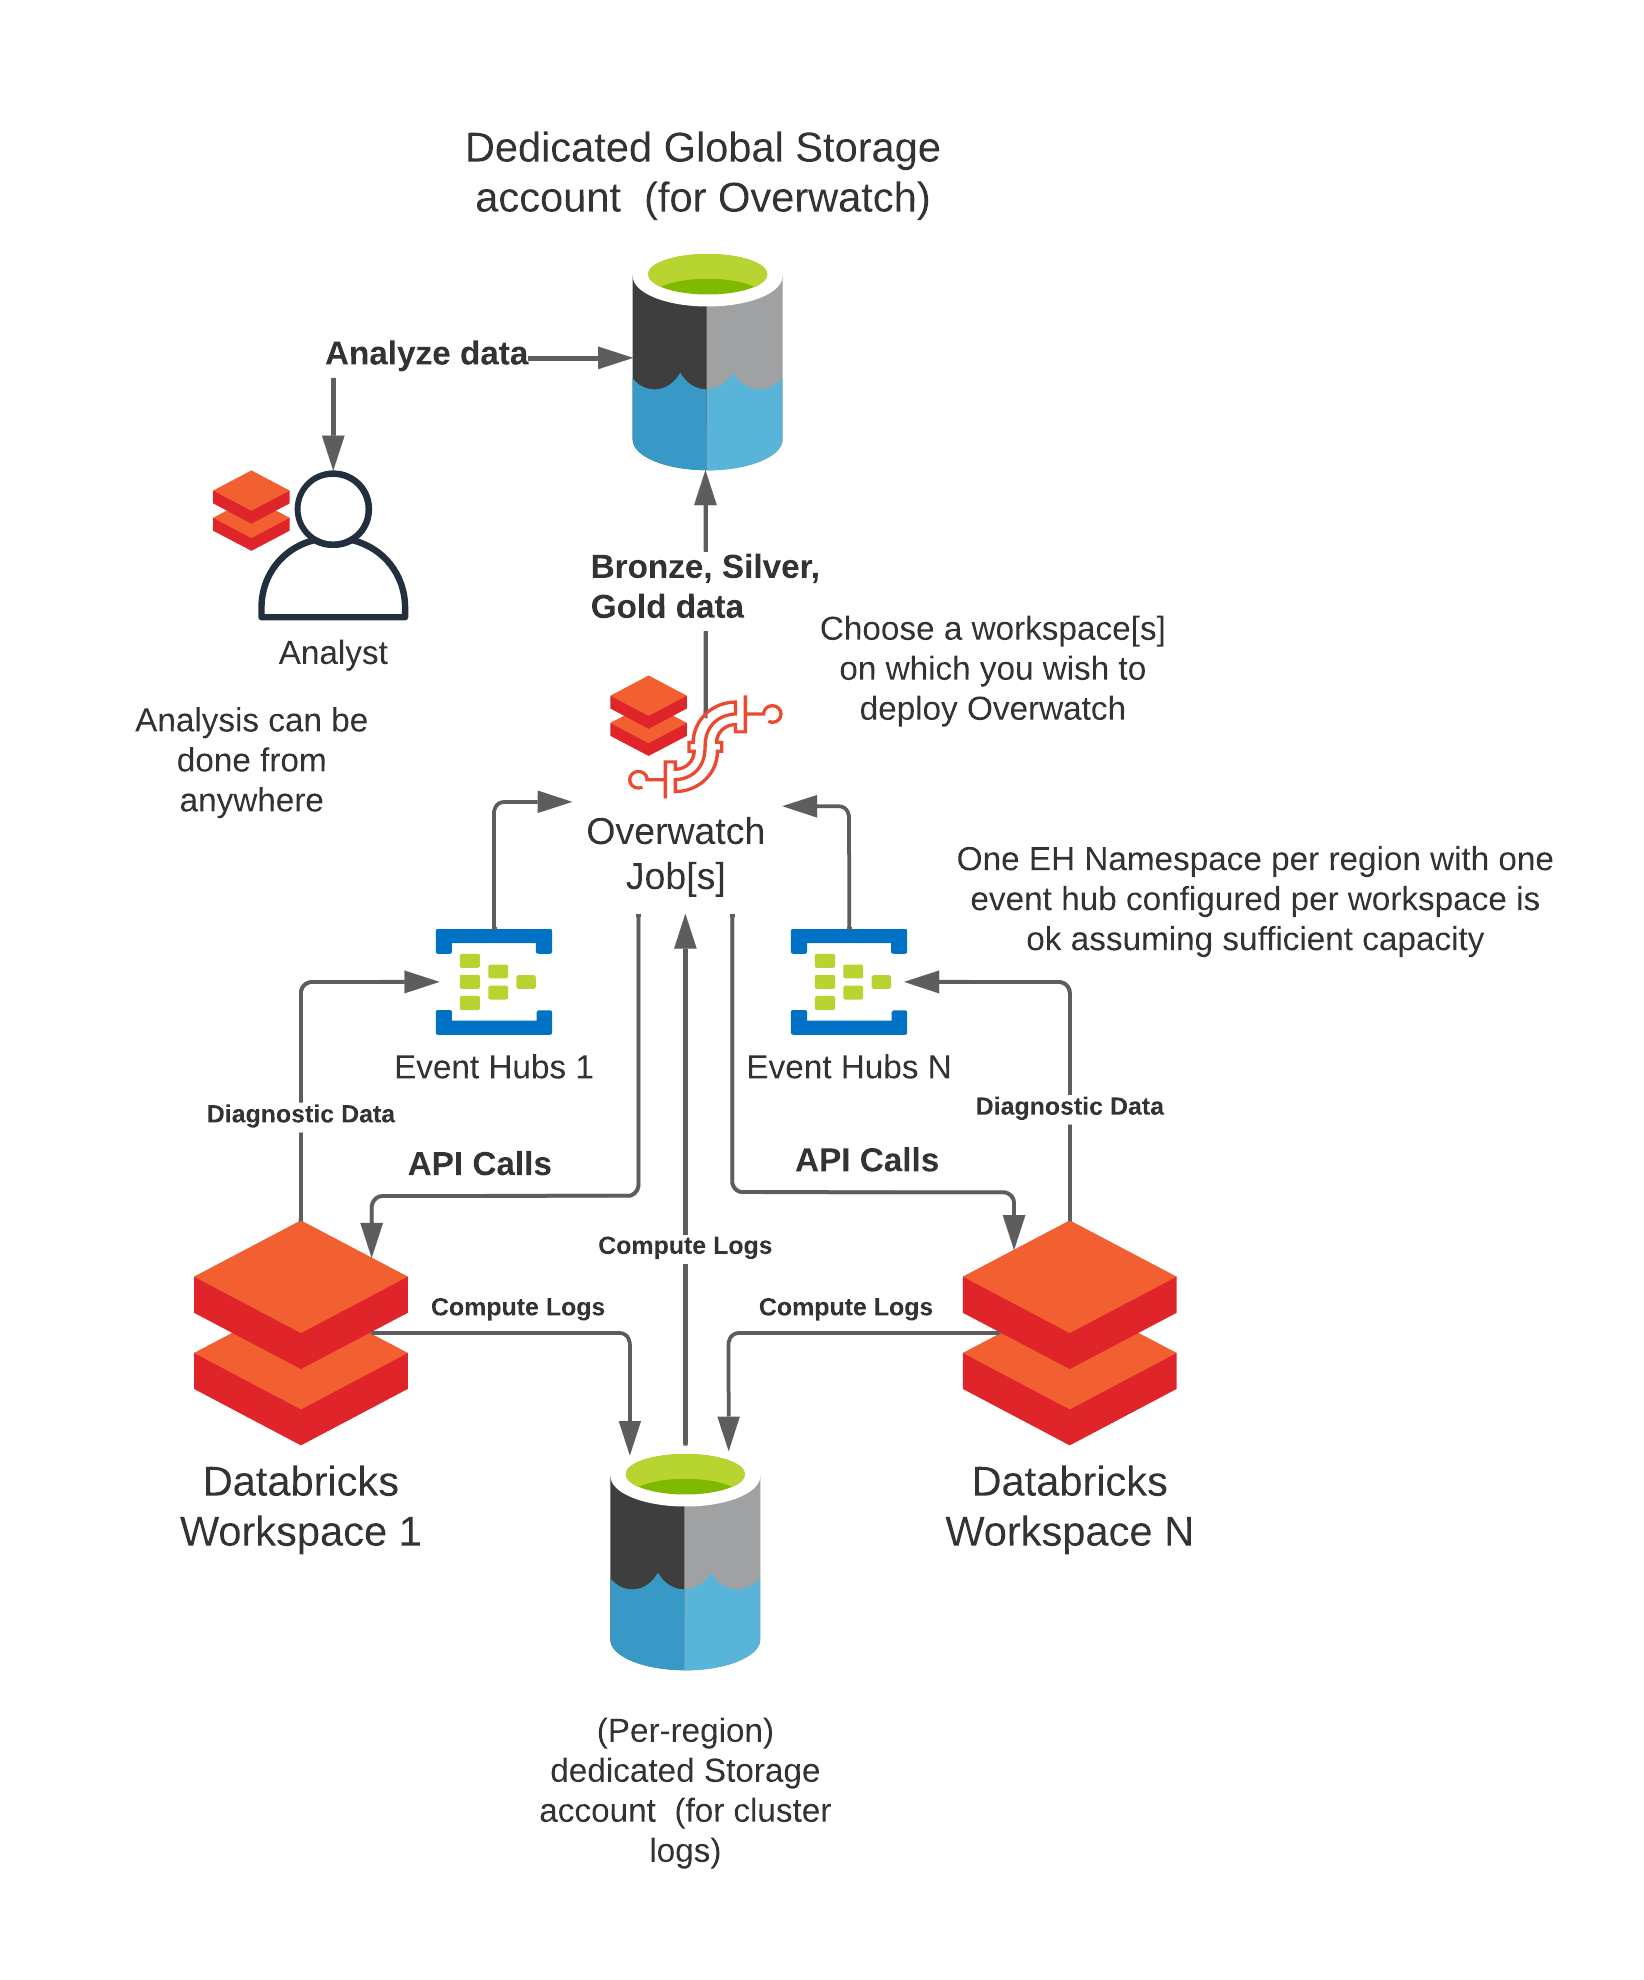
Reference Architecture
| Basic Deployment | Multi-Region Deployment |
|---|---|
 |
 |
Audit Log Delivery via Event Hub
- Audit Log Delivery
- At present the only supported method for audit log delivery is through Eventhub delivery via Azure Diagnostic Logging. Overwatch will consume the events as a batch stream (Trigger.Once) once/period when the job runs. To configure Eventhub to deliver these logs, follow the steps below.
LIMIT Max of 10 Event Hubs per Event Hub Namespace. If more than 10 workspaces are deployed in the same region plan to distribute your Event Hubs and Namespaces appropriately.
Configuring Event Hub
Step 1
Create or reuse an Event Hub namespace.
The Event Hub Namespace MUST be in the same location as your control plane
If you select the “Basic” Pricing Tier, just note that you will be required to ensure at least two successful Overwatch runs per day to ensure there won’t be data loss. This is because message retention is 1 day meaning that data expires out of EH every 24 hours. “Standard” Pricing tier doesn’t cost much more but it will give you up to 7 days retention which is much safer if you grow dependent on Overwatch reports.
Throughput Units In almost all cases, 1 static throughput unit is sufficient for Overwatch. Cases where this may not be true are include cases where there are many users across many workspaces sharing a single EH Namespace. Review the Throughput Units sizing and make the best decision for you.
Inside the namespace create an Event Hub
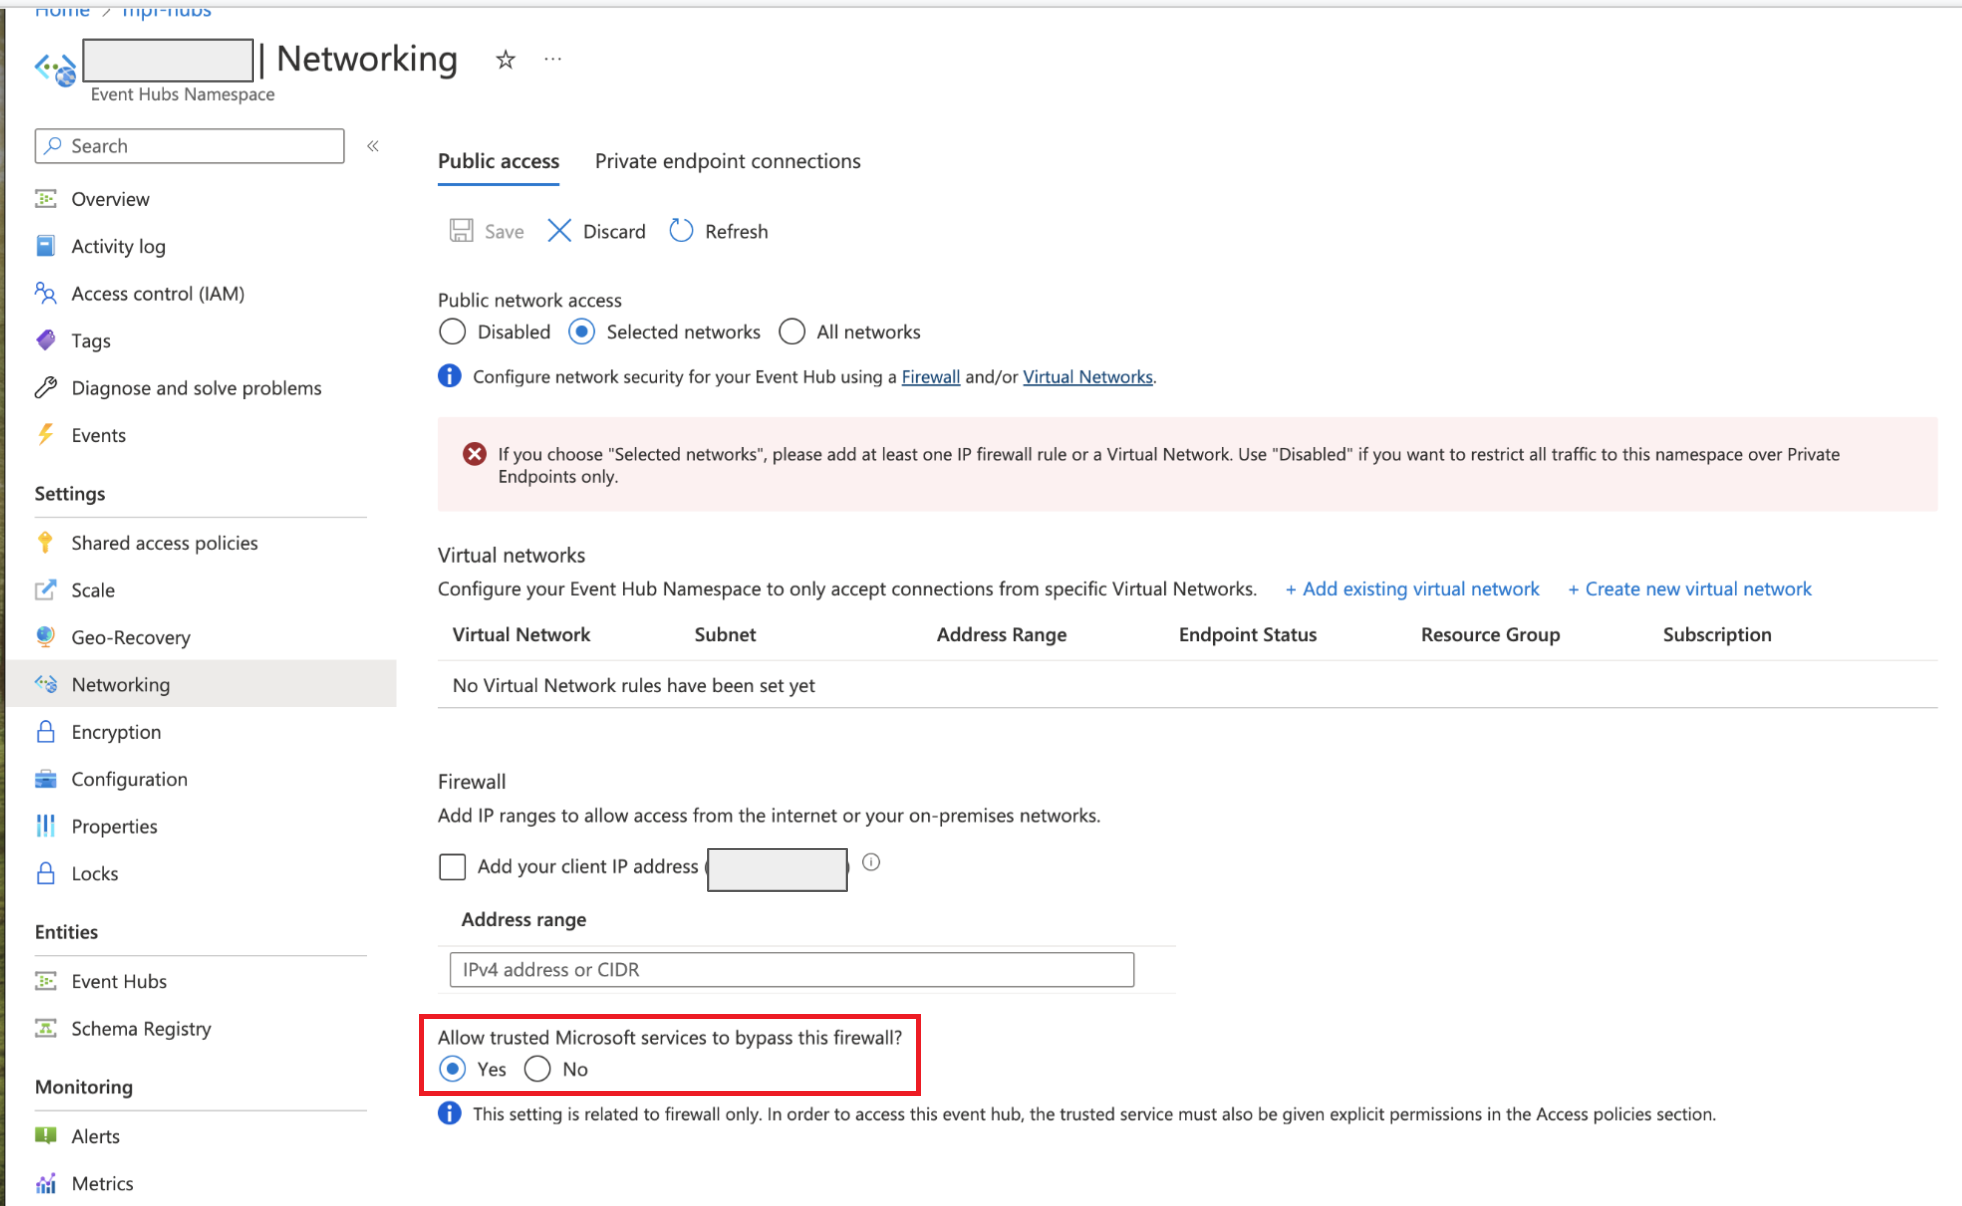
ALERT!!
If your Event Hub is behind a VNET, you must “Allow Trusted MSFT Services through the Firewall” or configure specific firewall rules. This should be done in the Event Hub Namespace –> Networking Tab; see screenshot below.
Step 2
Create an Event Hub inside your chosen (or created) EH Namespace.
Partitions The maximum number of cores (parallelism) that can simultaneously pull data from your event hub == EH partitions. In most cases this should be set to 32. It can be fewer, just be sure that Overwatch uses an autoscaling cluster to minimize costs while waiting to pull the data from EH. For example, if Overwatch is pulling 30 million events but only has 8 partitions, any worker cores over 8 will sit idle while all 30 million events are retrieved. In a situation like this, the minimum autoscaling compute size should approximately equal the number of partitions to minimize waste.
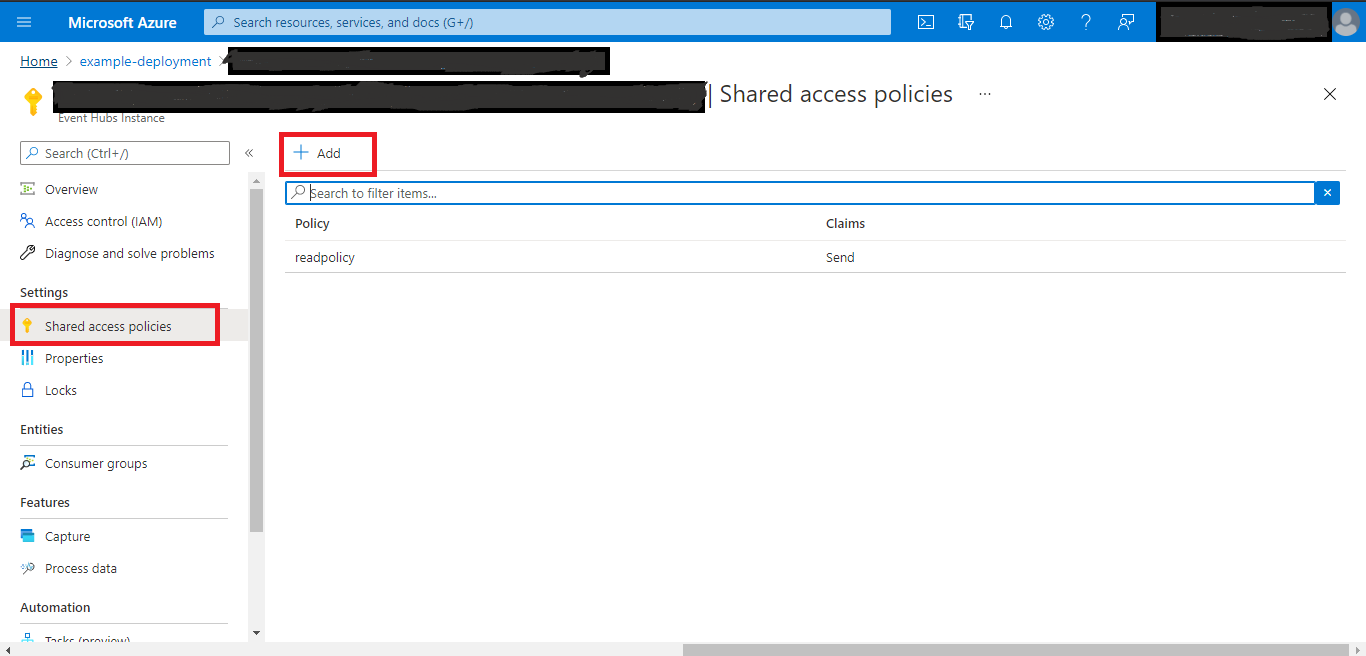
Once created, get the connection string from the SAS Policy for the Event Hub, find the following path in the Azure portal below.
eh-namespace –> eventhub –> shared access policies –> Connection String-primary key
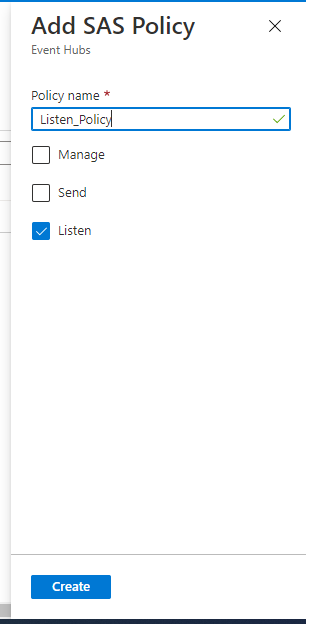
The connection string should begin with Endpoint=sb://. Note that the policy only needs the Listen permission
Click Add button and select Listen option for generate policies
 Copy the Connection string-primary key and create a secret using Key vault
Step 3
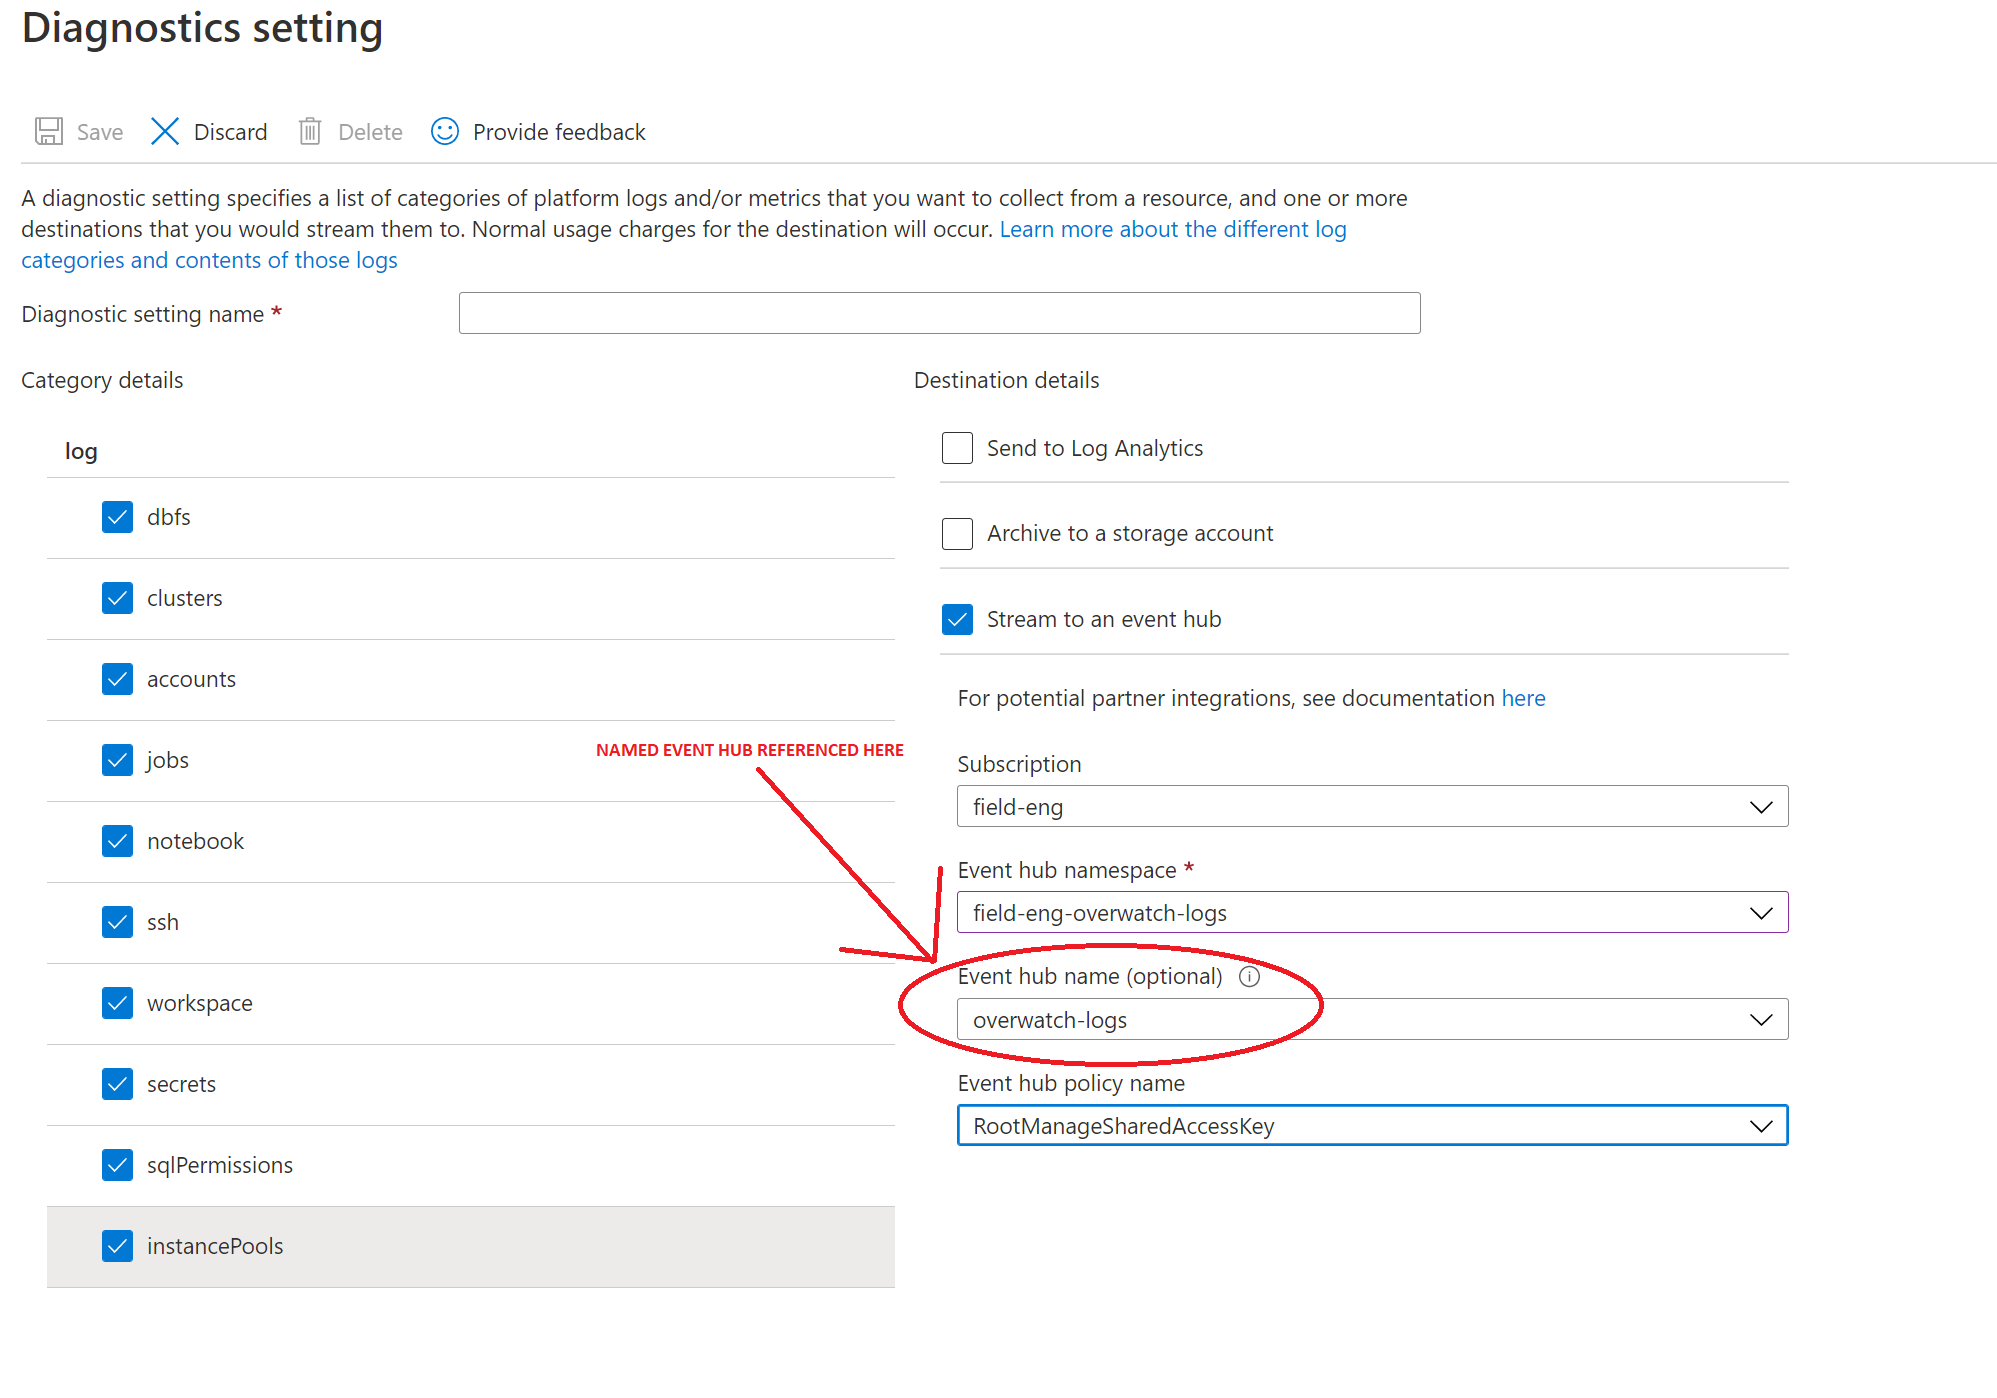
With your Event Hub Namespace and Named Event Hub created with data flowing, Navigate to your the Azure Databricks workspace[s] (in the portal) for which you’d like to enable Overwatch. Under Monitoring section –> Diagnostics settings –> Add diagnostic setting. Configure your log delivery similar to the example in the image below.
Additionally, ensure that the Overwatch account has sufficient privileges to read data from the Event Hub[s] created above. A common method for providing Overwatch access to the Event Hub is to simply capture the connection string and store it as a secret. Proper ways for accessing this will be in the getting started and configuration sections. There are many methods through which to authorize Overwatch, just ensure it has the access to read from the Event Hub Stream.
DO NOT leave Event hub name empty! Even though Azure doesn’t require an event hub name, you must create an event hub underneath the event hub namespace and give it a name. Reference the name here.
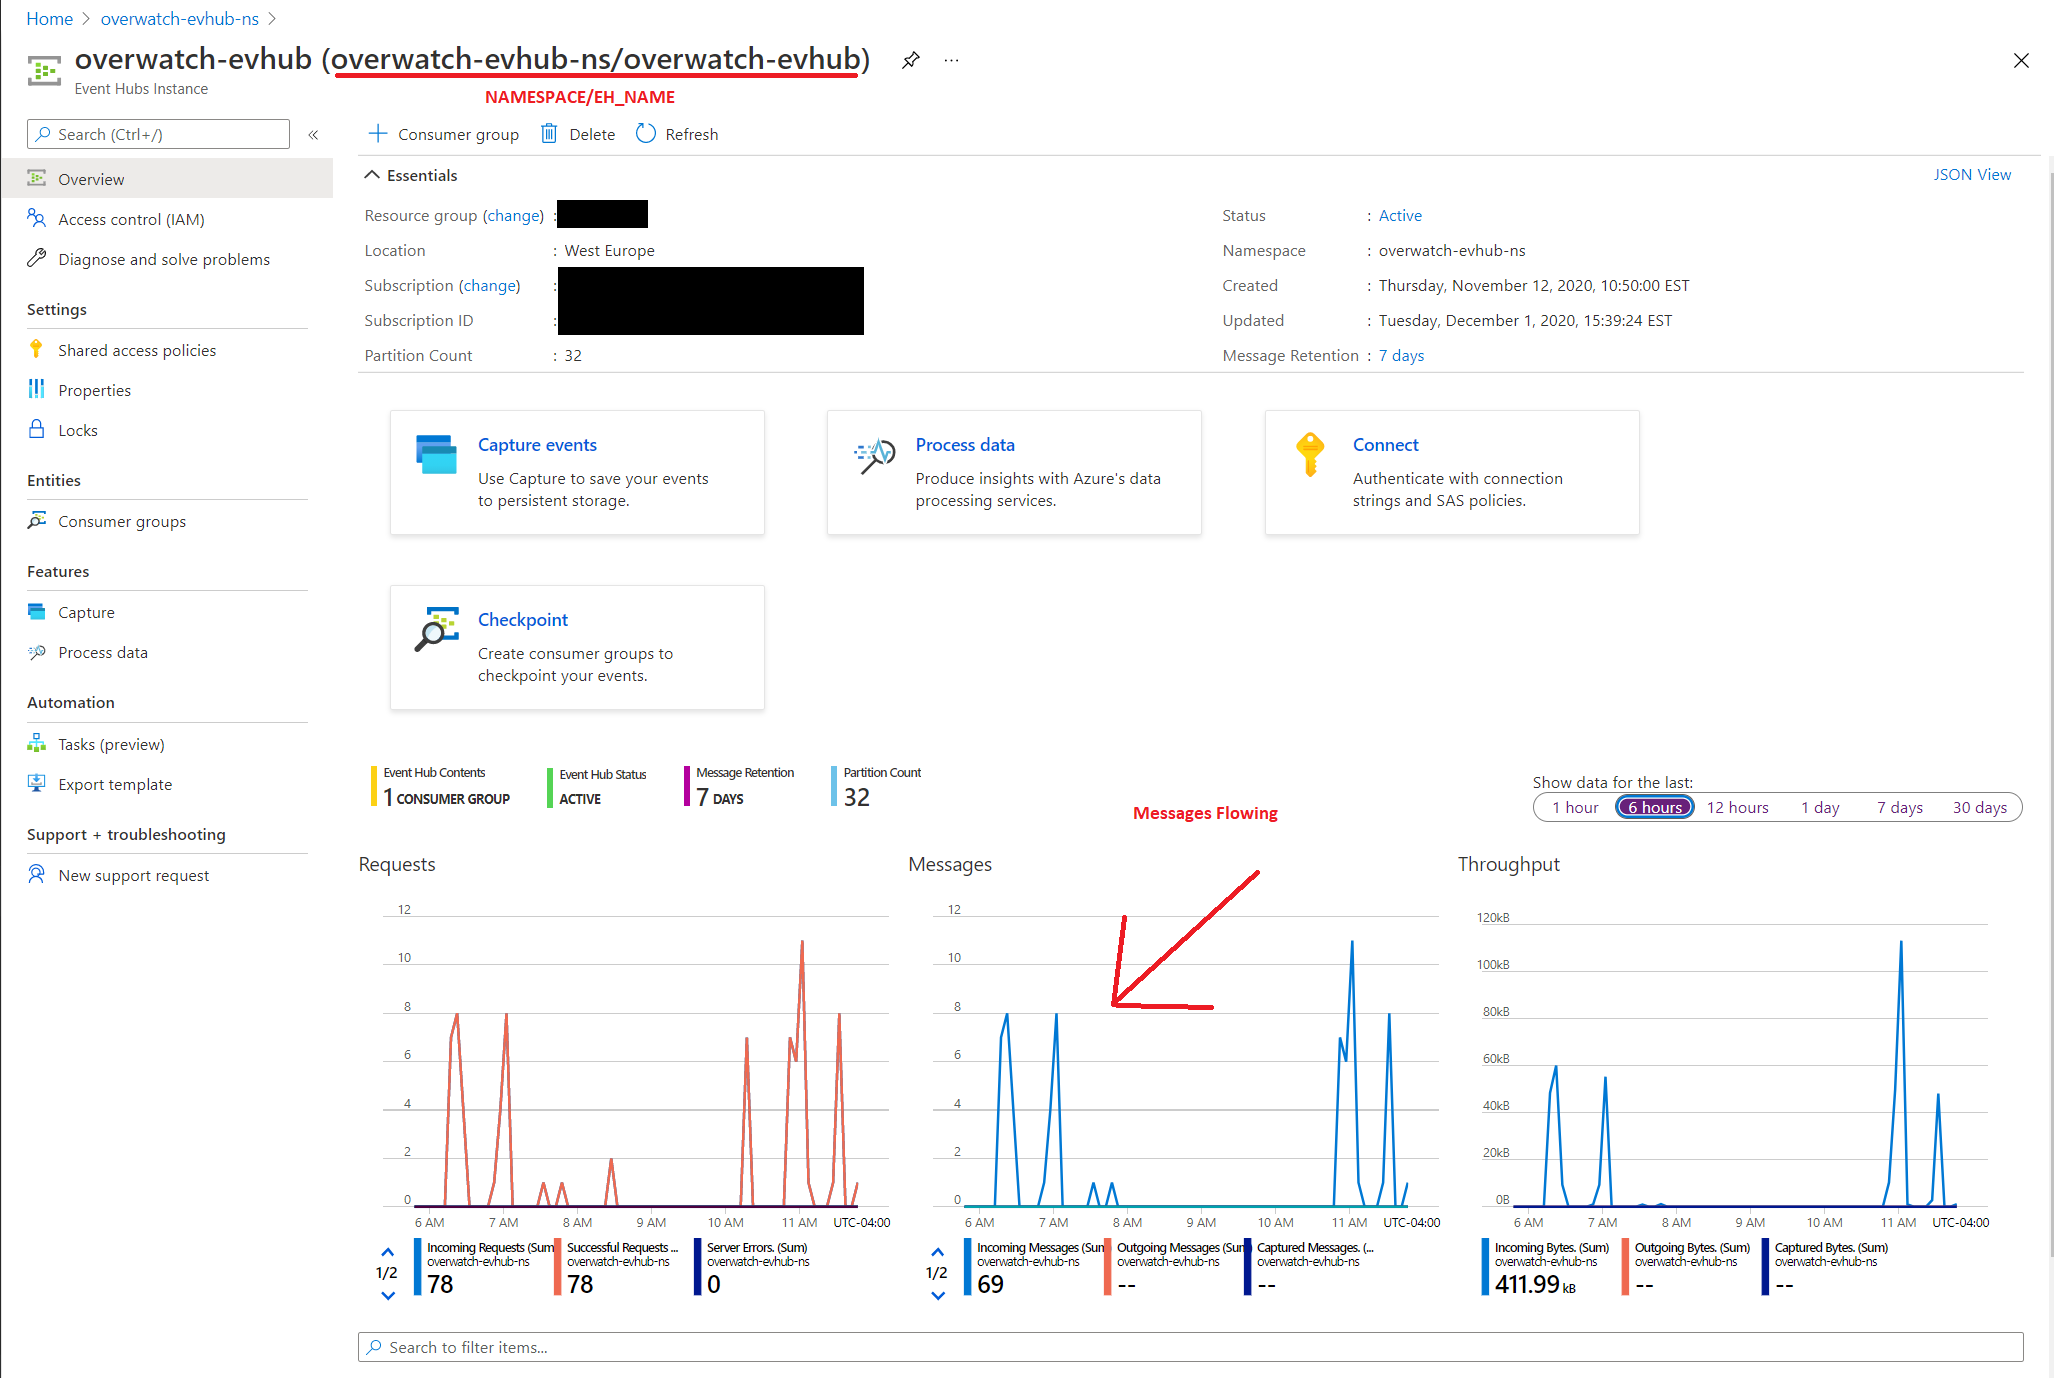
Step 4: Validate Messages Are Flowing
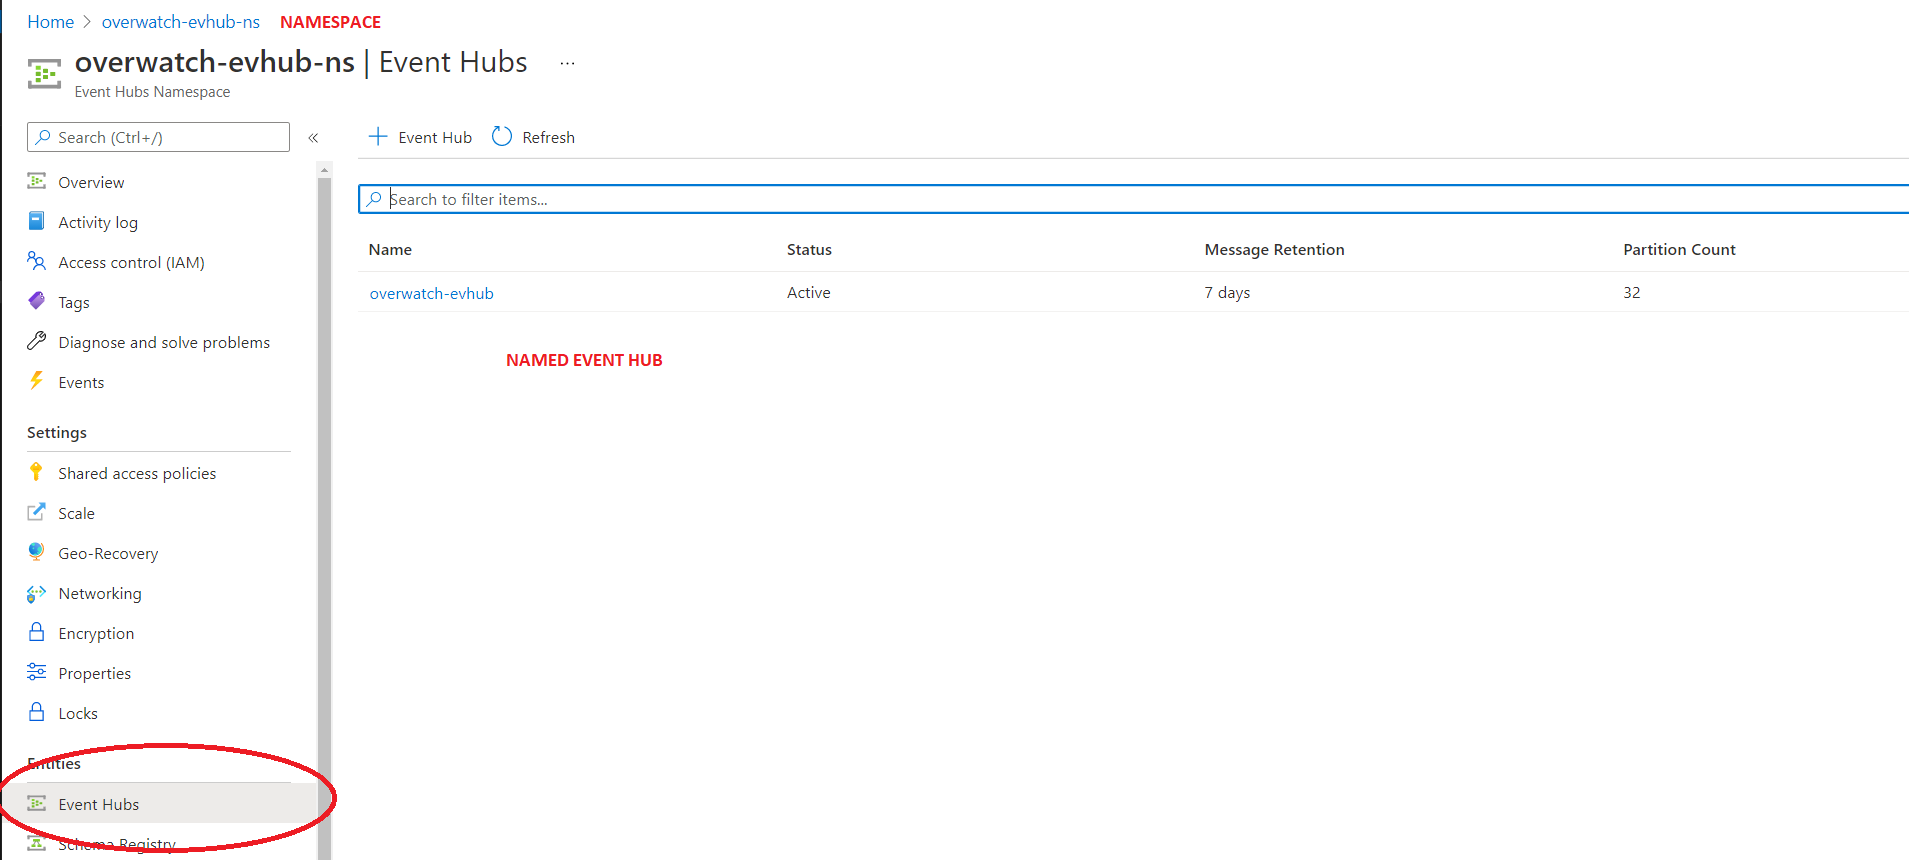
Now that you have configured you Overwatch EventHub Namespace, named Event Hub inside of the namespace, and pointed diagnostic logging to the EventHub it’s time to validate that messages are flowing. You may have to wait several minutes to begin to see messages flowing depending on how busy the workspace is. There are two things that are commonly missed, please double check the two bullet points below, there are images to help clarify as well.
- A named Event Hub has been created within the Namespace.
- Messages are flowing into the named event hub
Setting up Storage Accounts
The following steps are meant to be a baseline reference for setting up the storage accounts for Overwatch targets. With regard to security, we cannot make recommendations as to what is best for your organization in a global forum like this. For specifics regarding security implications of your storage account, please contact your Databricks sales representative or talk with your Databricks / Cloud administrators.
That said, the minimum technical requirement for Overwatch to function is that the storage account exist and be able to be access (read/write for Overwatch output, read for cluster logs) the storage from the Databricks workspace. All security consideration above this basic technical requirement should be commensurate with your organizational policies/standards.
Data locality is important for cluster logs. Cluster logs can be large and plentiful and as such, sending these to a storage account in a different geographical location can have significant performance impact. Keep this in mind and note that the reference architecture recommends at least one storage account per region to minimize latency and maximize bandwidth.
OVERVIEW
Barring the security and networking sections, once you’re setup is complete, your configuration should look similar
the the image below.
Step 1
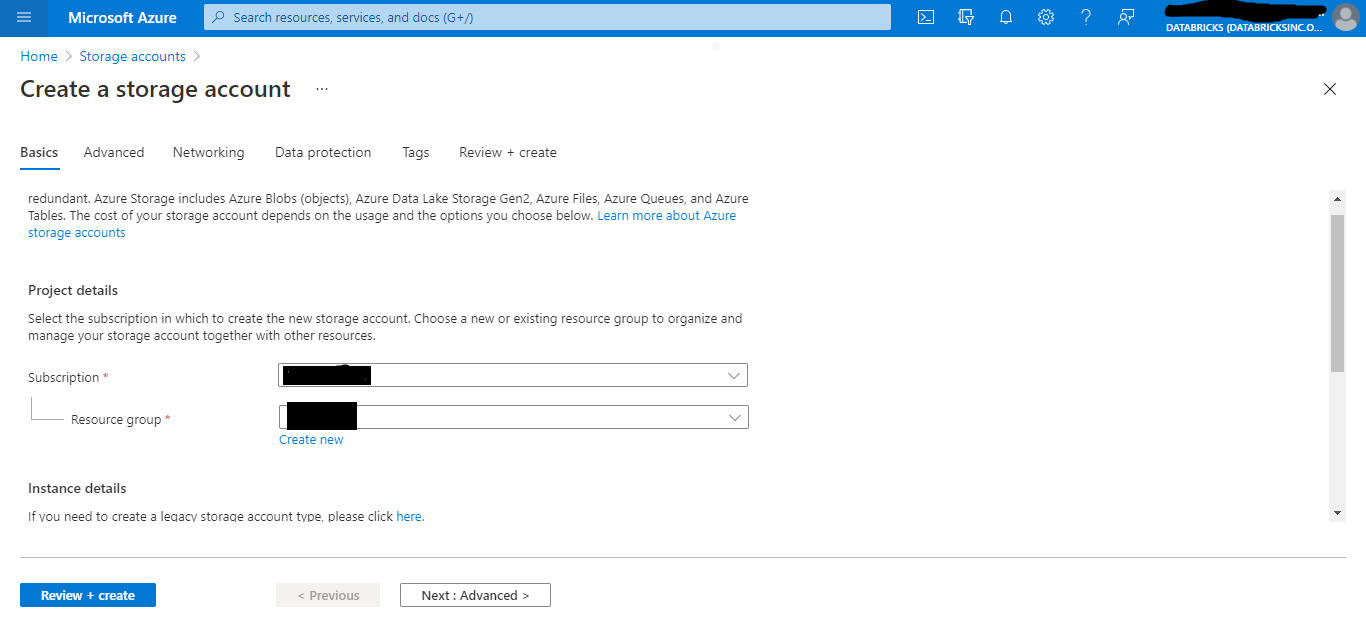
Select Storage Account from your Azure Portal and hit create
Step 2
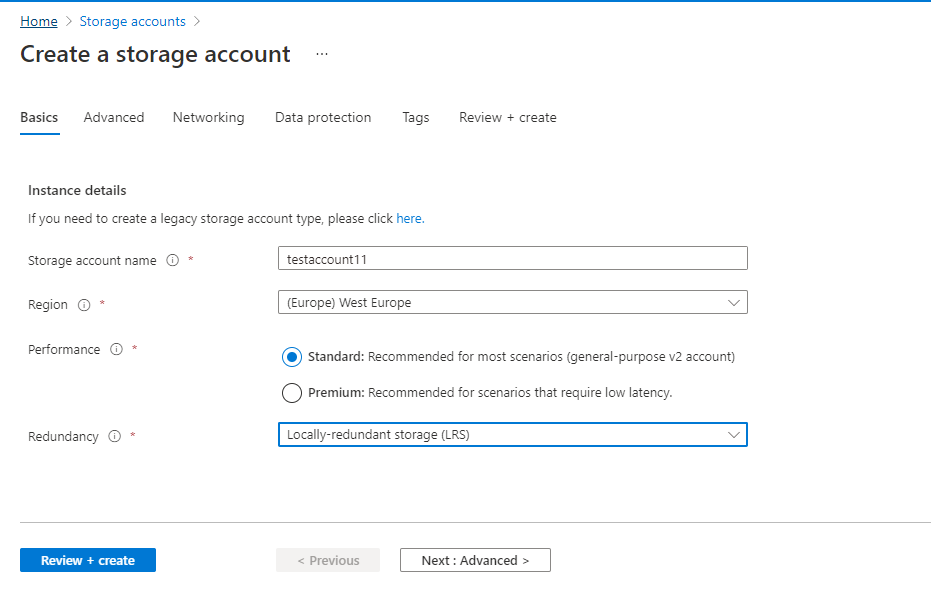
Enter your Subscription and Resource Group in Basics Tab
 Locally-Redundant Storage specified here but choose which is right for your organization. Standard storage is fine,
the required IOPS here are relatively low and, while premium storage will work, it’s at an added, unnecessary cost.
Locally-Redundant Storage specified here but choose which is right for your organization. Standard storage is fine,
the required IOPS here are relatively low and, while premium storage will work, it’s at an added, unnecessary cost.
Step 3
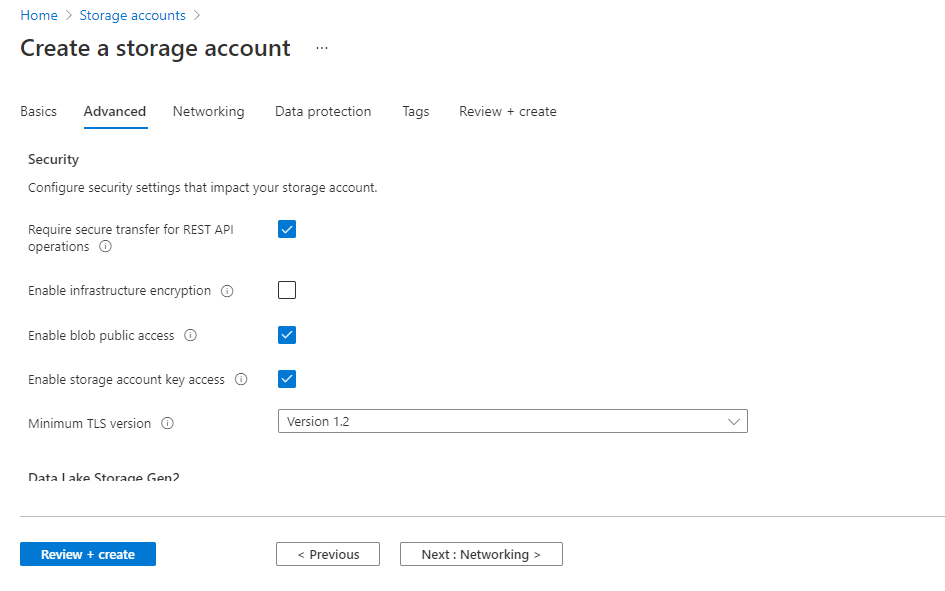
Recommendations
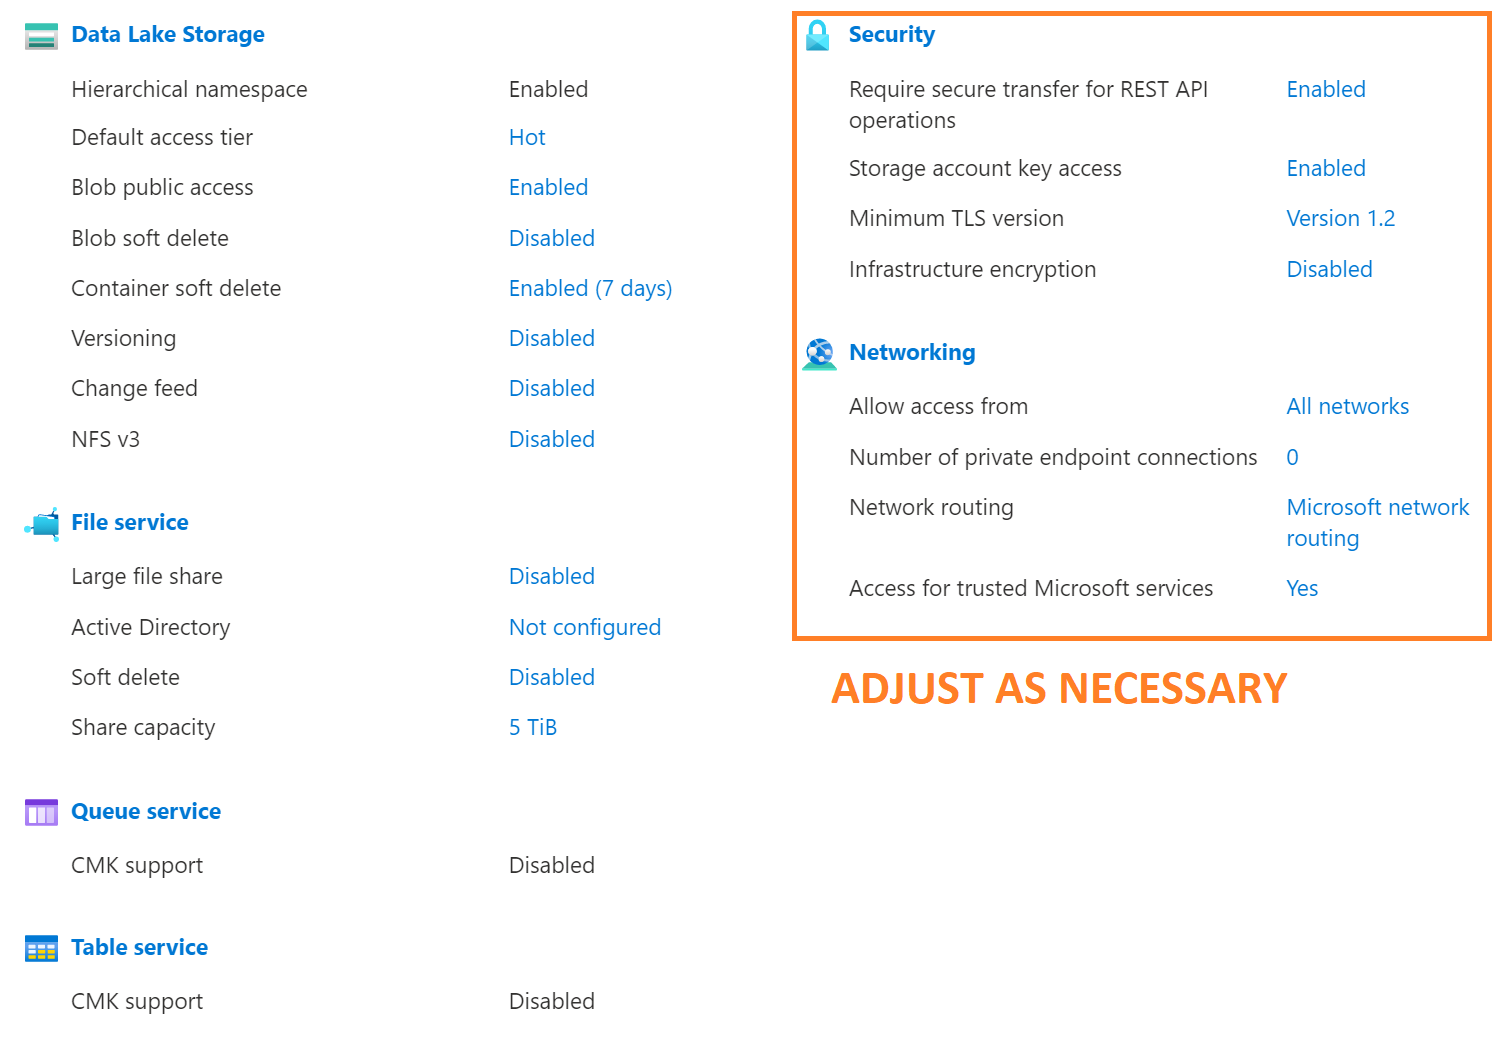
- Security – commensurate with your organization policies but must be accessible from the Databricks Workspace.
- Hot access tier
- Not tested on cold and cold will suffer significant performance loss
- Hierarchical namespace
- While hierarchical namespace is technically option, it’s STRONGLY recommended that this be enabled.
- Networking, similar to security, this should be configured commensurate with your corporate policies. The only
technical requirement is that the data in the storage account is accessible from the Databricks workspace.
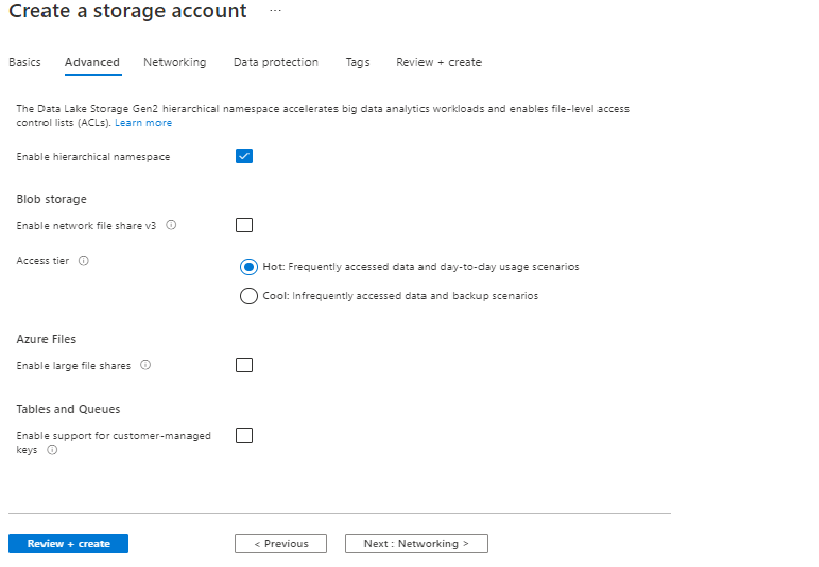
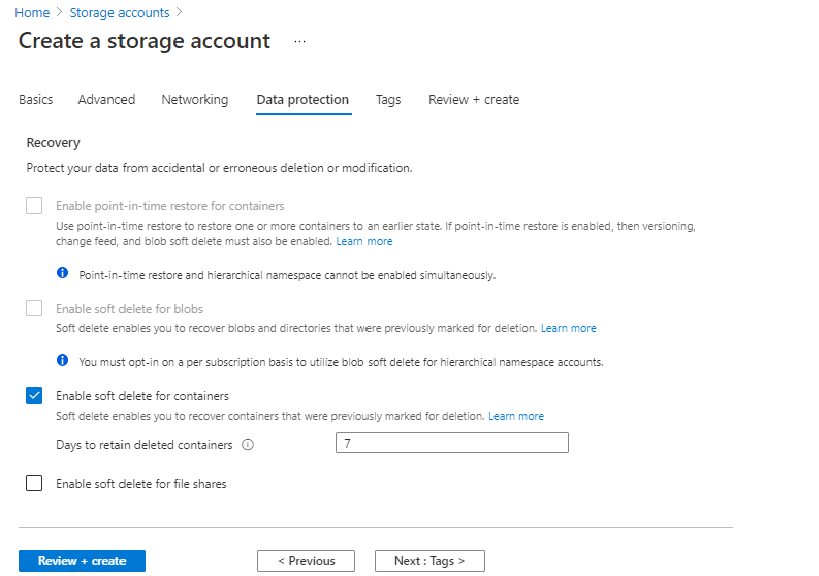
Step 4
You may choose any options you prefer here. Note that soft-deletion of BLOBs cannot be mounted to the Databricks
workspace and is considered an experimental feature.
It’s recommended that you do NOT enable BlOB soft deletes at this time for the Overwatch
storage account as it has not been fully tested. Container soft deletes are fine.
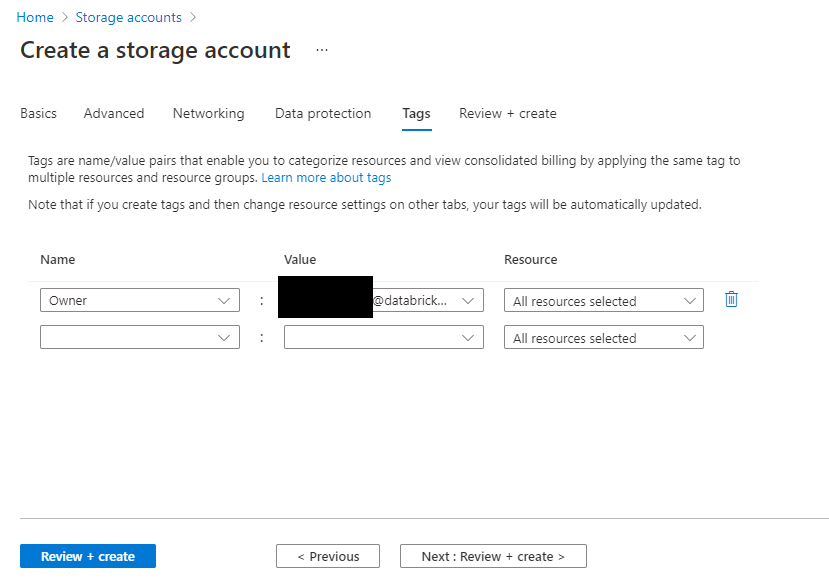
Step 5
Add relevant tags and create
Using the Storage Account
The overwatch output storage account may be accessed directly via:
- abfss://
- wasbs:// (not supported)
- A mounted filed system within Databricks. More information on mounting storage accounts can be found here.